|
Layout Process 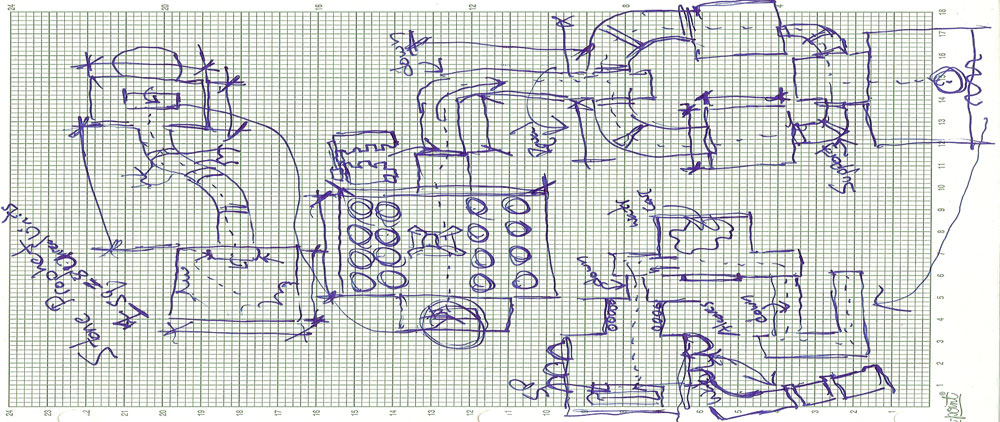 While this map was created with a mostly multi-player game it was always intended to have a single player layout. This was an idea and layout I had so I wanted to build it. The theme of this map is obviously Egyptian and while the layout is not a copy of anything in the game, this map pays homage to one of the first computer role-playing games I ever played; Stone Prophet from SSI. I started with the premise that the player would travel down a structure until arriving at the final chamber and coming face to face with the Stone Prophet which served as an ancient text which told the prophesy of the player. As an added touch I used the actual texture of the writing from the original game. I knew I wanted the Stone Prophet to be viewed as something more than just a plain old wall so I came up with the idea that it would be suspended in the air over a reflecting pool of water. I also made sure that the chamber it was in was one of the tallest and contained the most ornate and tallest architectural detail. I also wanted the path downwards to be somewhat different as well and one way (you would have to use the Stone Prophet to get out) so I added a section whereby the player had to swim down a well to progress further. The water tunnel came out in an inverted pool of water on the ceiling of the next chamber so the player now had no way to get out and must press forward. Through the rest of the journey the player travels further and further down through the ruins of the structure. As stated above my layout goal was to keep the player moving downwards the whole time to try and give the feeling that they were traveling to a place that was old and buried and which a lot of work had to be done in order to conceal whatever was in it. To start this feeling I had the entrance partially concealed behind a waterfall so it was not easily seen. Then I made the water tunnel to try and give the player the feeling that a sense of adventure and risk would have to be undertaken in order to progress further. In terms of construction I wanted to make sure the player felt cramped for a while then was rewarded with the entrance into wider areas. I did this by creating tunnels that connected the different rooms very narrow and in some cases poorly lit. Again I tried to convey the feeling that the player was being led somewhere to something that would require this kind of place. I also used height to try and make the player feel as if they were part of something bigger than themselves. I did this through the obvious way of having tall ceilings but the main way I achieved this was through adjusting the size of the structural components (static meshes) of the area to be larger than they normally would be and thus have the exaggerated effect of dwarfing the player. Once this was in place I added the detail static meshes, lights and then sounds. Building Process 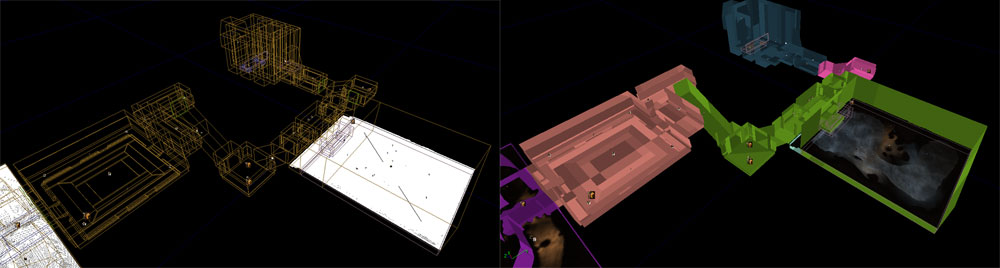 As I do with all of my Unreal 2 engine games I make sure that the map is zoned very well and that the player is not looking into to many at the same time. From here I begin making the base layout of the map by subtracting the base brushes I will need. In my layout drawing I place all of the measurements in Unreal units so that as I add this basic layout I dont have to waste time trying out different brush sizes. From this step I add and edit my terrain. This particular level used a lot of terrain because I wanted to make sure the floors looked sandy and had built up over by time. To do this I used six terrains. In order to lower render time I made sure that I deleted the portions of the terrain that didnt show. From here I began to add static meshes. As is often the case in order to get a tight fit with your brush work and not waste any space I usually have to edit vertices to be more snug around the meshes. For this map however this was less of a problem as I used a number of my own meshes that were already built to scale in 3DS Max. After placing the detail static meshes I moved on to lighting. Lighting Process 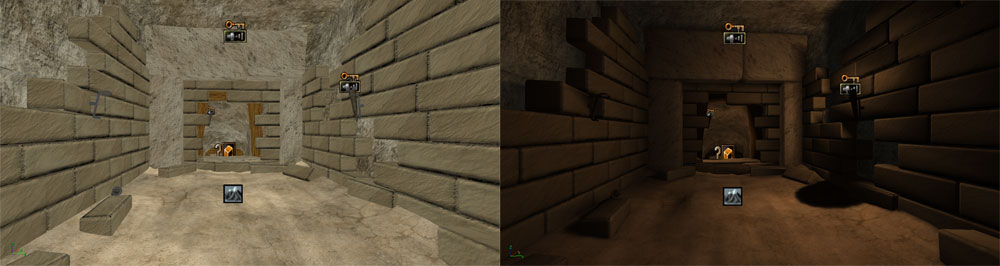 The lighting in this level was fairly straight forward as most everything was lit with fire light. To achieve this I used about the same color light actor for all of the torches and braziers with slight differences in brightness and radiuses. For areas like those around water I added muted blues to play as a reflection off the water from the light around it. Final Steps  As with all of my maps I added sounds last. Since this was a single player map in a multi-player game I didnt release it but as I said that was really never the point. I just wanted to make it. I let a few friends test it out for optimization sake but that was about it. Again, as with all of my maps, I tweak the heck out of it to make sure performance is good. |